2022-03-29
Surface roughness refers to the basic characteristics of the surface micro-profile. Surface roughness is one of the important indexes to evaluate product performance in the fields of machining, film preparation, micro and nano electromechanical system, optical precision machining and so on. Surface roughness is inevitably related to the friction and wear performance, corrosion resistance, combined sealing and fatigue resistance of machined parts, which has an important impact on the stability and reliability of parts and manufacturing equipment. Surface roughness is also an important parameter for the evaluation and characterization of the micro-surface morphology of functional structural components. So how to accurately detect surface roughness? Don't worry, first look at the principle of spectral confocal with the editor of vertical technology
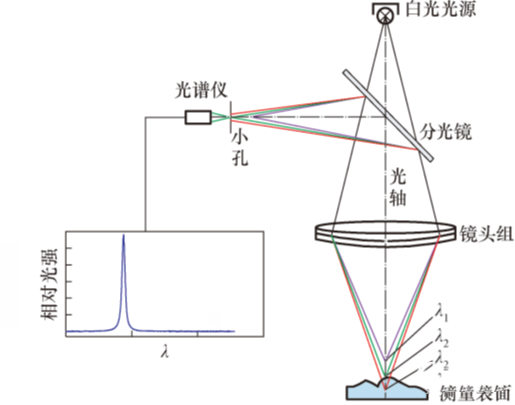
Schematic diagram of spectral confocal displacement sensing
Through the lens group formed by special optical design, the multi-color parallel light emitted by the white light source is spectrally divided to form a series of monochromatic light with different wavelengths, and then it is coaxial focused, thus forming a focus group within the effective range, and the monochromatic light wavelength of each focus corresponds to an axial position. During the measurement, the spectral peak value is analyzed by the spectrometer and the peak value extraction algorithm is used to determine the height and position information of the measured point.
So how does spectral confocal measure surface roughness?
(1) Positioning of the workpiece to be tested. The workpiece to be measured is placed smoothly on the measuring platform of the coordinate measuring machine, and the standard ruby needle is used to measure its spatial position and attitude, which provides data for determining the measuring position according to the measurement process requirements.
(2) Contour scanning. The measuring arm of the measuring machine changes the optical probe mounted with the spectral confocal sensor, drives the probe to the workpiece measurement position, adjusts the light intensity of the light source, the exposure time of the spectrometer and the acquisition frequency to ensure that the sensor is in a good working state, and starts the contour scanning measurement after editing the motion parameters such as scanning step and speed. The transverse coordinates and sensor height information in the scanning process are recorded synchronously on the host computer, and mapped into the two-dimensional microscopic profile of the measurement area.
(3) Calculation and evaluation of surface roughness. The two-dimensional microscopic contour data obtained by scanning is input into the contour processing algorithm for calculation, the appropriate cut-off wavelength is selected according to relevant international standards, the original contour is filtered according to the Gaussian contour filtering method, the surface roughness profile is obtained, and the evaluation midline of the roughness profile is calculated. Then, according to the calculation method of the relevant evaluation index of surface roughness, the measurement results are obtained, and the surface roughness information of the workpiece is obtained at last.
It is necessary to coordinate the control of the scanning actuator and the displacement sensor on the same platform for the scanning of the micro profile of the workpiece and the measurement of surface roughness.
Based on USB communication interface and protocol, the functions of communication, control, adjustment and data flow transmission of probe sensor and motion mechanism were developed in the upper computer LabVIEW development environment, and a relatively complete hardware communication control architecture of the measurement system was formed. The control structure of the main system was shown in the figure below.
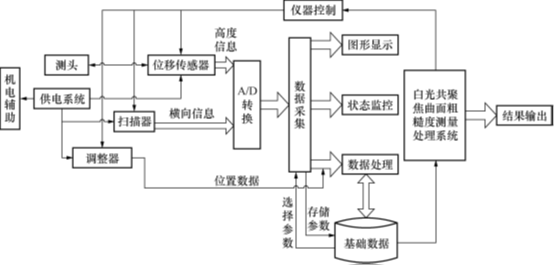
System control structure diagram
In order to facilitate the use and measurement, a user-friendly interface window is developed for the control system. See the following figure to facilitate the control of sensor related parameters and preview the contour information in the scanning process. It can also preset and edit the scanning motion strategy, adjust the name of the stored data and other functions, and add additional spectral signal display, integrated contour filtering and evaluation methods, which can achieve timely data output after scanning measurement.
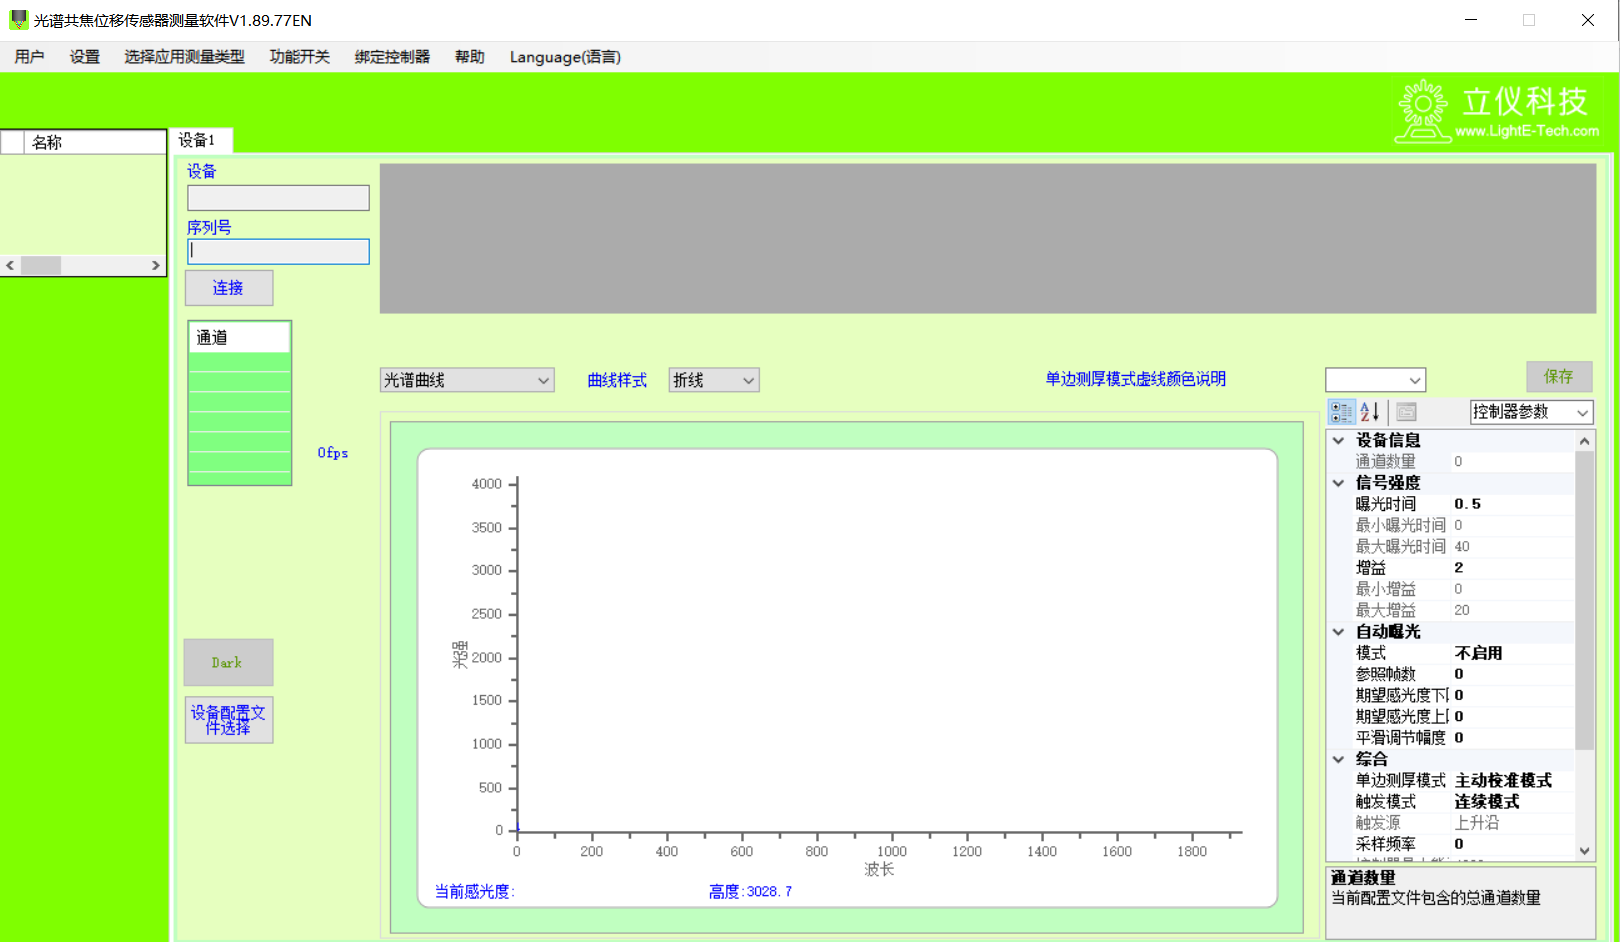
Figure 5 Surface roughness measurement system control front panel
After the previous preparation and debugging, the final outline is obtained (as shown below) :

Through the introduction of Liyi Technology small series, I believe you have a general understanding of how spectral confocal surface roughness measurement, Liyi spectral confocal displacement sensor is widely used in 3D glass measurement, LTCC thickness measurement, thread hole depth measurement, glue thickness measurement has accumulated rich experience. 3D glass measurement includes optical lens thickness, various transparent glass thickness, mobile phone glass thickness measurement, display thickness measurement, etc. LTCC thickness measurement includes crystal shape measurement, mobile phone metal step height measurement, silver paste thickness measurement and new energy battery electrode thickness measurement. More inquiries Welcome to pay attention to Liyi Technology
